 admin1
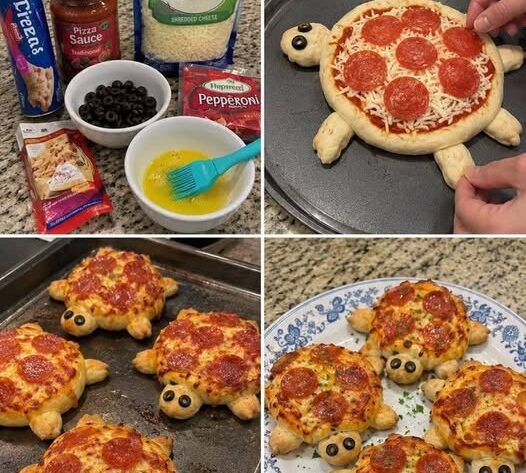
Looking for a dinner that will make the kids excited to come to the table? These Turtle-Shaped Pepperoni Pizzas are as adorable as they are delicious! Made with soft pizza dough, flavorful marinara sauce, gooey mozzarella cheese, and classic pepperoni, these little pizzas are shaped like friendly turtles and decorated with simple edible details.
Whether you’re planning a fun family dinner, a children’s birthday party, a sleepover, or simply want to make an ordinary pizza night a little more memorable, these turtle pizzas are guaranteed to bring smiles. Kids can even help assemble and decorate their own turtles, making dinner preparation part of the fun.
The best part is that you don’t need complicated ingredients or advanced decorating skills. With a little creativity, ordinary pizza dough transforms into a collection of cute, golden-brown turtles with crispy pepperoni shells, cheesy bodies, and olive eyes.
Why You’ll Love These Turtle Pizzas
Homemade pizza is already a family favorite, but turning it into an adorable animal makes it even more exciting.
These turtle-shaped pizzas are:
- Fun and creative
- Kid-friendly
- Easy to customize
- Perfect for pizza night
- Great for parties and playdates
- Made with simple ingredients
- Easy for little helpers to assemble
You can make one large turtle pizza to share or create several smaller turtles so everyone gets their own personal pizza. The individual version is especially fun because each child can decorate their turtle differently.
Ingredients
For the basic turtle pizzas, you’ll need:
- 1 pound pizza dough
- ½ cup marinara sauce
- 1½ cups shredded mozzarella cheese
- Pepperoni slices
- Black olives
- A little olive oil, optional
- Italian seasoning, optional
- Garlic powder, optional
You can use homemade pizza dough or your favorite store-bought dough. If you’re using refrigerated or frozen dough, let it come to room temperature according to the package directions so it becomes easier to shape.
For the olive eyes, black olives work beautifully because they are easy to cut into small pieces and provide a fun contrast against the melted cheese.
How to Make Turtle-Shaped Pepperoni Pizzas
1. Prepare the Dough
Start by preheating your oven to 425°F (220°C). If you’re using a pizza stone or pizza steel, allow it to preheat as well.
Lightly flour your work surface and place the pizza dough on it. Gently stretch or roll the dough until it is smooth and workable.
Divide the dough into smaller portions if you’re making individual turtles. Depending on the size you want, you can make approximately 4–6 small pizzas.
The exact number will depend on how large you make each turtle.
2. Create the Turtle Shape
This is where the recipe gets especially fun.
For each turtle, shape the dough into a rounded oval for the body. Then use small pieces of dough to create the turtle’s head, four little legs, and a tail.
Place the body in the center of a parchment-lined baking sheet. Position the head at one end, four legs around the sides, and a tiny tail at the opposite end.
Gently press the pieces together where they meet the body. This helps keep everything connected while baking.
Don’t worry about making every turtle perfect. In fact, slightly imperfect shapes often make them look even cuter!
If you’re making these with children, let them help shape the turtles. They can create their own versions with different expressions and body shapes.
3. Add the Marinara
Using a spoon, spread a thin layer of marinara sauce over the main body of each turtle.
Try to keep most of the sauce on the oval-shaped body rather than the head and legs. This will help the turtle’s shape remain visible after baking.
Leave a small border around the edges so the sauce doesn’t spill over the sides.
You don’t need a lot of sauce. A thin layer provides plenty of tomato flavor while allowing the mozzarella and pepperoni to shine.
4. Add the Mozzarella
Sprinkle shredded mozzarella generously over the marinara sauce.
Mozzarella is ideal because it melts beautifully and creates that classic stretchy pizza texture. Spread it evenly over the turtle’s body, leaving the head, legs, and tail mostly uncovered.
As the cheese melts, it will form a delicious golden layer over the pizza.
If you’d like even more flavor, sprinkle a little Italian seasoning or garlic powder over the cheese.
5. Create the Pepperoni Shell
Now it’s time to turn your pizza into a turtle!
Arrange pepperoni slices over the mozzarella-covered body. Try overlapping them slightly to create the appearance of a turtle’s shell.
You can use whole pepperoni slices for larger turtles or cut them into smaller pieces for smaller pizzas.
For an extra decorative touch, arrange the pepperoni in a pattern. You can create a circular shell design, overlapping rows, or simply place the slices evenly across the cheese.
As the pizza bakes, the pepperoni will become slightly crisp around the edges and release flavorful oils into the melted cheese.
6. Add the Turtle Eyes
Cut black olives into tiny pieces and place two small pieces on the turtle’s head to create the eyes.
You can use little olive circles, thin strips, or even tiny squares. If you’re making these pizzas with young children, an adult should handle the cutting.
For an extra-cute look, you can add small pieces of mozzarella around the olive eyes to make them stand out.
If your children don’t like olives, you can use tiny pieces of another pizza-friendly ingredient instead.
7. Bake the Pizzas
Place the baking sheet in the preheated oven and bake for approximately 12–18 minutes, depending on the size and thickness of your pizzas.
They’re ready when the dough is golden brown, the mozzarella is melted and bubbly, and the pepperoni has started to crisp around the edges.
Keep an eye on the smaller turtles because they may cook more quickly than a larger pizza.
For an extra golden cheese topping, you can broil the pizzas for the final minute, but watch them carefully so the cheese doesn’t burn.
8. Cool and Serve
Remove the pizzas from the oven and let them cool for a few minutes before serving.
The cheese will be extremely hot straight from the oven, so giving the pizzas a little time to cool is especially important when serving children.
Once they’re cool enough to handle, transfer the turtle pizzas to plates and serve them warm.
Tips for Making the Cutest Turtle Pizzas
Don’t overload the toppings. Too many toppings can make the turtle shape difficult to see. Keeping the body relatively simple helps the design stand out.
Use parchment paper. It makes cleanup easier and helps prevent the dough from sticking to the baking sheet.
Make the body slightly thicker. A sturdy body gives you enough surface area for the marinara, mozzarella, and pepperoni shell.
Keep the legs and head smaller. Smaller pieces are easier to shape and help the finished turtle look proportional.
Let kids decorate. Set out the dough, sauce, cheese, pepperoni, and olives and let children create their own turtle designs.
Fun Variations
There are plenty of ways to customize these pizzas.
Try adding cooked sausage, mushrooms, bell peppers, onions, or sliced olives to the shell. For a vegetarian version, skip the pepperoni and create a colorful vegetable shell instead.
You can also experiment with different cheeses. A combination of mozzarella and cheddar gives the turtles a richer color and flavor, while provolone adds another delicious layer of cheesiness.
For a spicy version, add a pinch of crushed red pepper flakes or use spicy pepperoni.
Make It a Family Pizza Night
These turtle pizzas are more than just a meal—they’re an activity.
Set up a small pizza-making station with bowls of toppings and let everyone build their own turtle. Children can decide whether their turtle has a happy face, funny eyes, a giant shell, or a completely unique design.
You can even give each turtle a name before dinner!
Serve the pizzas alongside a simple green salad, fresh fruit, vegetable sticks, or your favorite dipping sauce. A little bowl of extra marinara makes a great dip for the crust.