 admin1
Seriously, a big thank you to whoever shared this recipe! I’m totally addicted. This creamy chocolate treat is incredibly delicious, unbelievably smooth, and has quickly become my go-to no-sugar summer must-have.
If you love chocolate ice cream but don’t want to load your dessert with refined sugar, this recipe is definitely worth trying. It uses simple ingredients and creates an amazingly rich, silky texture that looks almost too good to be homemade.
The best part? No complicated ice-cream machine is required! With a few everyday ingredients, a blender or food processor, and a little patience, you can make a creamy chocolate dessert right at home.
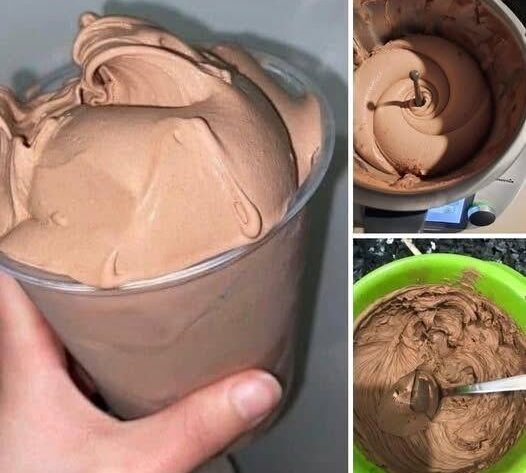
The texture in the photo is exactly what makes this recipe so tempting: thick, smooth, fluffy, and intensely chocolatey. It’s the kind of dessert where you take one spoonful and immediately think, “Okay, I need another one!”
Why You’ll Love This Chocolate Ice Cream
There are so many reasons this recipe has become a summer favorite.
It’s quick to prepare, requires only a handful of ingredients, and is naturally sweetened with ripe bananas rather than refined sugar. The bananas also give the ice cream its wonderfully creamy consistency.
Cocoa powder adds that deep chocolate flavor we all crave, while yogurt gives the mixture a smooth and slightly tangy richness.
And because everything comes together in a blender or food processor, cleanup is incredibly easy.
This is the perfect recipe when you want something cold and chocolatey without spending an entire afternoon in the kitchen.
Ingredients
Here’s what you’ll need:
- 3 large ripe bananas
- 3 tablespoons unsweetened cocoa powder
- ½ cup plain Greek yogurt
- 1 teaspoon vanilla extract
- 2–4 tablespoons unsweetened milk, as needed
- A small pinch of salt
- 1 tablespoon natural peanut butter or almond butter, optional
- Unsweetened chocolate chips or chopped nuts, optional
A Note About the Bananas
The bananas are important because they provide the natural sweetness in this recipe. The riper they are, the sweeter your finished ice cream will taste.
Look for bananas with plenty of brown spots on the peel. They may not be the prettiest bananas for eating, but they are absolutely perfect for homemade frozen desserts!
If your bananas aren’t very ripe, the finished ice cream may taste less sweet.
How to Make No-Sugar Chocolate Ice Cream
Step 1: Freeze the Bananas
Peel your ripe bananas and slice them into small pieces.
Arrange the pieces in a single layer on a tray lined with parchment paper. Freeze for at least 3–4 hours, although overnight is even better.
Freezing the banana pieces individually makes blending much easier.
Step 2: Add Everything to the Blender
Place the frozen banana pieces into a high-powered blender or food processor.
Add the unsweetened cocoa powder, Greek yogurt, vanilla extract, and a tiny pinch of salt.
The salt might seem like a strange addition, but just a little helps bring out the chocolate flavor.
Start blending.
At first, the mixture may look crumbly or difficult to process. Don’t worry! This is completely normal.
Stop the machine occasionally and scrape down the sides.
Step 3: Add a Little Milk
Add the milk one tablespoon at a time while blending.
You don’t want to add too much. The goal is to create a thick, creamy consistency rather than a thin smoothie.
Keep blending until the mixture becomes smooth and resembles soft-serve ice cream.
This can take a little patience, especially if your bananas are frozen very solid.
Step 4: Make It Extra Creamy
For an extra rich flavor, add a spoonful of natural peanut butter or almond butter.
Blend again until completely incorporated.
The nut butter is optional, but it adds a beautiful richness and pairs wonderfully with chocolate and banana.
At this stage, taste your mixture.
If you’re happy with the sweetness and chocolate flavor, you’re ready for the next step.
Soft-Serve or Scoopable Ice Cream?
You actually have two options.
If you love soft-serve-style ice cream, you can enjoy it immediately after blending.
The texture will be thick, creamy, and spoonable, just like the consistency shown in the photo.
If you prefer traditional scoopable ice cream, transfer the mixture to a freezer-safe container.
Smooth the top with a spoon or spatula and freeze for approximately 2–3 hours.
For the easiest scooping, let it sit at room temperature for a few minutes before serving.
Because this recipe doesn’t contain the same stabilizers and ingredients found in commercial ice cream, it can freeze quite firmly. A short resting time makes all the difference.
Delicious Topping Ideas
Although this chocolate ice cream is delicious on its own, toppings can make it even more special.
Try adding:
- Chopped roasted almonds
- Crushed walnuts
- Unsweetened coconut flakes
- Fresh strawberries
- Fresh raspberries
- Sliced banana
- Natural peanut butter
- Chopped dark chocolate
- Cocoa nibs
- A sprinkle of cinnamon
For a beautiful presentation, scoop the ice cream into a chilled bowl and add a few berries and chopped nuts on top.
It looks fancy enough for guests but takes only minutes to prepare.
Easy Flavor Variations
Once you’ve tried the basic recipe, don’t be afraid to experiment.
Chocolate Peanut Butter
Add two tablespoons of natural peanut butter to the blender for a delicious chocolate-peanut-butter combination.
Chocolate Coconut
Replace some of the milk with unsweetened coconut milk and add a little unsweetened shredded coconut.
Double Chocolate
Add a small amount of unsweetened cocoa nibs or sugar-free chocolate pieces after blending.
Chocolate Berry
Serve the finished ice cream with fresh strawberries or raspberries. The slight tartness of the berries tastes fantastic with the rich chocolate.
Tips for Perfect Homemade Ice Cream
Use ripe bananas. This is the number-one tip. Ripe bananas provide more natural sweetness and a smoother texture.
Don’t add too much liquid. Start with just a tablespoon of milk and add more only if your blender needs help.
Use good-quality cocoa powder. Since chocolate is one of the main flavors, a good unsweetened cocoa powder can make a noticeable difference.
Freeze bananas ahead of time. Whenever you have bananas becoming overripe, slice them and store them in the freezer. You’ll always have the main ingredient ready.
Don’t over-freeze before serving. If you’ve stored the ice cream overnight, allow it to sit for several minutes before scooping.
Frequently Asked Questions
Can I make this without Greek yogurt?
Absolutely. You can substitute unsweetened coconut yogurt or another thick, unsweetened yogurt.
Is this recipe really sugar-free?
It contains no added refined sugar, but bananas naturally contain sugars. So it’s more accurate to describe it as a no-added-sugar dessert, rather than completely sugar-free.
Can I make it without a blender?
A food processor works very well. If you only have a standard blender, work in small batches and scrape the sides as needed.
How long can I keep it in the freezer?
For the best texture and flavor, enjoy it within a couple of weeks. Store it in a tightly sealed freezer-safe container.
The Perfect Summer Treat
There is something incredibly satisfying about making your own frozen dessert at home. You control the ingredients, you can adjust the flavors, and you don’t need an expensive ice-cream machine.
This chocolate banana ice cream is creamy, naturally sweet, wonderfully chocolatey, and perfect for those hot summer days when you want something cold and refreshing.
And honestly, thank you to whoever shared this recipe in the first place! It has become one of those recipes that I keep coming back to again and again.