 admin1
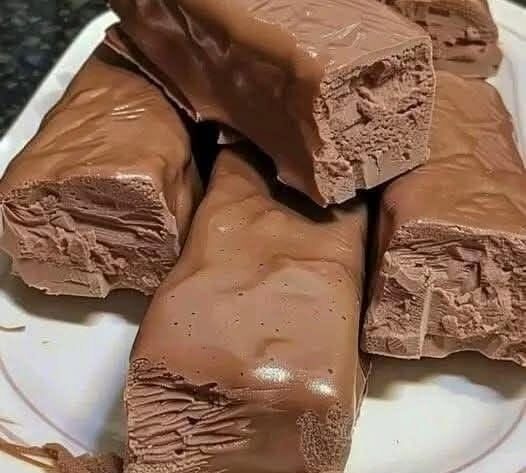
Easy Keto Chocolate Nougat Candy is a simple homemade dessert that combines a creamy coconut filling with a smooth dark chocolate coating. It is designed for anyone looking for a low-carb candy recipe that feels indulgent without relying on traditional high-sugar ingredients. The combination of coconut oil, coconut cream, sugar-free desiccated coconut, vanilla, and a sugar-free sweetener creates a rich filling with a pleasant chewy texture. Once the chilled coconut bars are covered in melted dark chocolate, they become an irresistible homemade keto dessert that works beautifully as an after-dinner treat, afternoon snack, or make-ahead sweet. Unlike baked desserts, this recipe requires no oven, making it especially convenient when you want something quick and uncomplicated.
Why This Keto Chocolate Candy Is Worth Making
Homemade keto candy can be surprisingly easy when the recipe focuses on a few ingredients that naturally provide flavor and texture. These chocolate nougat-style bars are especially appealing because the filling does not require complicated baking techniques. Coconut cream provides richness, coconut oil helps the mixture become firm once chilled, and desiccated coconut gives the center its satisfying bite. The dark chocolate coating adds a deep cocoa flavor that balances the mild sweetness of the coconut mixture. Because the recipe is prepared in advance and chilled before coating, it is also useful for meal preparation. You can make a batch, keep the pieces refrigerated, and have a convenient low-carb dessert ready whenever a sweet craving appears.
What Makes These Homemade Keto Bars Different
Many keto dessert recipes rely heavily on cream cheese, nut butter, or complicated flour combinations. This recipe takes a different approach by making coconut the main ingredient in the filling. The result is a texture that is dense enough to hold its shape but still soft when eaten. The chocolate shell creates a pleasant contrast against the tender coconut interior, giving every piece the feel of a small candy bar. Using dark chocolate also helps create a more intense chocolate flavor rather than making the dessert taste excessively sweet. For people searching for easy keto desserts, sugar-free candy recipes, or homemade low-carb chocolate treats, this recipe offers a practical option that can be prepared without baking and stored for later.
Understanding the Coconut Filling
The coconut filling is the heart of this easy keto candy recipe, so the ingredients need to be combined carefully. Coconut oil works as both a source of richness and a structural ingredient because it firms up when cold. Coconut cream contributes moisture and a creamy consistency, while the desiccated coconut absorbs some of that moisture and creates the body of the filling. Vanilla extract rounds out the flavor, while the stevia blend provides sweetness without adding regular sugar. Since different brands of coconut and sweeteners can have slightly different textures, the finished mixture should be thick enough to press and shape. If it feels too loose, chilling it briefly can make handling easier before the bars are formed.
Why Chilled Coconut Cream Works Well
Using cold coconut cream is particularly useful when preparing homemade coconut chocolate bars. Refrigerating the coconut cream overnight allows the thicker portion to separate more clearly from the liquid in many cans. The thicker cream gives the filling a richer consistency and helps it hold together with the desiccated coconut. This is one reason the preparation is worth planning ahead rather than opening the coconut cream immediately before mixing. If the coconut cream does not separate after chilling, it can still be used; simply mix or shake it thoroughly before measuring. The important point is to avoid introducing unnecessary excess liquid into the filling, because a wetter mixture can become difficult to shape and may require additional chilling.
Preparing the Coconut Mixture
The preparation begins by gently melting the coconut oil until it becomes completely liquid. It should then be allowed to cool slightly before being combined with the coconut cream and vanilla extract. This prevents the mixture from becoming unnecessarily warm and keeps the ingredients easier to combine. Once the wet ingredients are smooth, the desiccated coconut and stevia blend can be incorporated gradually. Stir until the coconut is evenly coated and the mixture looks uniform throughout. The finished filling should be moist rather than watery and should be capable of being pressed together. Taking a little time at this stage is important because unevenly mixed coconut can produce bars that crumble or have inconsistent sweetness.
How to Get the Right Candy Texture
Texture is one of the most important parts of a homemade candy recipe. If the filling is too loose, it will be difficult to shape and may soften quickly when exposed to warm melted chocolate. If it is too dry, the finished bars can become crumbly instead of tender. The balance comes from combining the coconut cream, melted coconut oil, and desiccated coconut thoroughly and then allowing the mixture to chill. The coconut absorbs the moisture as it rests, while the coconut oil firms as the temperature drops. If the mixture needs additional firmness, a short chilling period before shaping can make a significant difference. The goal is a compact filling that can be pressed firmly without breaking apart.
Two Practical Ways to Shape the Bars
There are two straightforward approaches for shaping these homemade keto chocolate bars. The first is to divide the mixture into individual portions and press each portion firmly into a small bar shape. This approach gives you direct control over the size and appearance of every piece. The second option is to press the entire mixture into a suitable lined container or pan, compacting it firmly into an even layer before chilling. Once firm, the slab can be cut into equal bars using a sharp knife. The second method is especially convenient when preparing a larger batch because it produces pieces with consistent thickness and makes portioning much faster. Whichever method you choose, pressing the coconut mixture firmly is essential for keeping the bars intact.
Why Freezing Before Chocolate Coating Matters
Chilling is not simply a waiting period in this recipe; it plays an important role in the structure of the candy. The coconut oil firms as it becomes cold, which helps the shaped bars hold their form when they are dipped into melted chocolate. Around 30 minutes in the freezer is enough to make the bars firm enough to handle according to the source recipe. If the filling is still soft when you try to coat it, it can break apart or become difficult to lift from the chocolate. Keeping the pieces cold also creates a pleasing contrast between the firm chocolate shell and the softer coconut center once the finished candy has been refrigerated.
Melting Dark Chocolate Without Burning It
The chocolate coating needs gentle treatment because dark chocolate can easily become overheated. The chocolate may be melted in short microwave intervals or slowly on the stovetop over low heat. Stirring regularly helps distribute the heat and encourages an even, smooth texture. The goal is chocolate that is fluid enough for dipping but not excessively hot. If chocolate becomes overheated, it can develop a thick or unpleasant texture that makes coating difficult. A little patience during this stage produces a much better finish. The original recipe also notes that a small amount of coconut oil may be used to thin the chocolate if necessary, although additional oil can make the coating softer in warm conditions.
Coating the Keto Nougat Bars
Once the coconut bars are thoroughly chilled and the chocolate is smooth, the coating process becomes straightforward. Use a fork or dipping tool to lower each cold bar into the melted chocolate. Turn it gently so that the chocolate reaches the sides and top, then lift it out and allow excess chocolate to drip back into the bowl or saucepan. Place the coated piece on baking paper so the chocolate can set without sticking. Working with chilled pieces is particularly helpful because the cold filling encourages the chocolate to firm more quickly. If the coconut bars become soft during the coating process, return them to the freezer briefly before continuing with the remaining pieces.
Creating an Even Chocolate Shell
A smooth chocolate coating makes these homemade keto candies look much more polished. To achieve an even shell, avoid leaving the bars submerged in chocolate for too long. Dip, turn, lift, and allow the excess to drain naturally. A fork can also be tapped gently against the edge of the bowl to remove excess chocolate before transferring each piece to the tray. Leave enough space between the bars so they do not touch while the coating sets. If you want a thicker shell, the first coating can be allowed to firm before applying another light layer. However, even a single coating creates a satisfying contrast between the dark chocolate exterior and coconut center.
Flavor Balance in a Low-Carb Dessert
The flavor of this candy depends on the balance between coconut, vanilla, sweetener, and dark chocolate. Coconut has a naturally rich and slightly sweet character, while vanilla adds warmth and depth. The stevia blend provides the sweetness needed to make the dessert taste like candy without using ordinary sugar. Dark chocolate brings bitterness and cocoa intensity, preventing the filling from becoming overly sweet. Choosing an appropriate dark chocolate is therefore important. An 85% dark chocolate is suggested in the original recipe, but the final flavor will depend on the specific chocolate used. When all the elements are combined, the result is a dessert with a rich chocolate exterior and creamy coconut flavor.
Making the Recipe Ahead of Time
One of the strongest advantages of this easy keto dessert is that it can be prepared ahead of time. Once the bars are coated and the chocolate has completely hardened, they can be transferred to an airtight container and stored in the refrigerator. This makes the recipe useful for busy weekdays, planned gatherings, or anyone who prefers having prepared desserts available. Instead of making a sweet treat from scratch every time a craving appears, you can prepare multiple portions in one session. The bars can also be frozen for longer storage, allowing you to keep a batch available for future occasions. This make-ahead quality makes the recipe especially practical compared with desserts that need to be served immediately.
Notes for Better Results
For the best texture, refrigerate the coconut cream before beginning the recipe, ideally overnight. Make sure the coconut oil is fully melted but not excessively hot when it is combined with the other filling ingredients. Press the coconut mixture firmly when shaping so that the finished pieces remain compact. Do not skip the freezer stage because firm bars are much easier to coat with chocolate. When melting the chocolate, use low heat or short microwave intervals and stir regularly. If the filling seems dry, work with it patiently and allow it to chill before deciding whether the consistency needs adjustment. If the chocolate is too thick for dipping, a small amount of coconut oil can help loosen it, although this should be used cautiously in warm climates.
Common Problems When Making Keto Chocolate Candy
A few small preparation mistakes can affect the final texture. A filling that feels crumbly may not have enough moisture from the coconut cream, or the coconut itself may be particularly dry. A filling that feels too soft may simply need additional chilling. Another common problem is attempting to coat the bars before they are sufficiently cold. Soft coconut pieces are more likely to break when they meet warm melted chocolate. Chocolate that becomes thick or grainy is often the result of overheating, so gentle melting is preferable. Paying attention to temperature throughout the recipe is therefore more important than rushing any individual step. These simple adjustments can make homemade keto candy much easier to prepare successfully.
How to Store the Finished Candy
Once the chocolate coating has completely hardened, place the candy in an airtight container. Refrigeration is recommended for maintaining the structure of the coconut filling, particularly in warm weather. According to the source recipe, the finished bars can be refrigerated for up to one week. For longer storage, the bars may be frozen in a freezer-safe container, with baking paper between layers to prevent them from sticking together. When you want to eat a frozen piece, allow it to soften slightly before serving. Keeping the candy protected from excess moisture and air will help preserve its texture and prevent the chocolate from developing an undesirable surface.
Serving Ideas for Keto Chocolate Nougat
These chocolate coconut bars are versatile enough to serve in several ways. They can be enjoyed straight from the refrigerator when you want a firm, chilled candy texture, or allowed to sit for a few minutes so the coconut center becomes softer. They pair naturally with black coffee, espresso, unsweetened tea, or another low-sugar beverage. Small pieces can also be arranged on a dessert platter alongside other homemade keto treats. Because the bars are individually portioned, they are convenient for snack boxes and prepared dessert containers. For gatherings, cutting the bars into smaller pieces creates bite-sized treats that are easy to serve without requiring plates or utensils.
Simple Variations to Try
Although the original ingredient list should remain unchanged for this recipe, there are several ways to vary the presentation and serving style without changing the core preparation. Instead of making long bars, the mixture can be shaped into smaller squares or bite-sized pieces. A slab can also be cut into thin rectangles for a more traditional candy-bar appearance. The thickness of the chocolate coating can be adjusted by controlling how much chocolate remains on each piece after dipping. These presentation choices allow the same recipe to look different depending on the occasion. For everyday snacking, smaller pieces are practical, while larger bars can create a more substantial dessert serving.
Is This a No-Bake Keto Dessert?
Yes, this recipe is particularly convenient because it does not require conventional baking. The coconut filling is mixed, shaped, chilled, and then coated in melted chocolate. That makes it a useful choice when you want an easy keto dessert without heating the oven. The preparation still requires attention to temperature, particularly when melting the coconut oil and chocolate, but the process is considerably simpler than many baked low-carb desserts. The no-bake format also makes it suitable for warm days when you would rather avoid extended oven use. With a small amount of preparation and chilling time, the finished candy can be ready to enjoy.
Can You Make These Into Bite-Sized Keto Candies?
Absolutely. Instead of shaping approximately 20 larger pieces, the mixture can be divided into smaller portions. Bite-sized candies are particularly convenient for dessert platters because they provide a small taste without requiring a full bar. They also work well when you want to control portion sizes. The smaller pieces should still be pressed firmly so that the coconut filling remains intact during chocolate dipping. Because smaller pieces have more surface area relative to their size, they may also become firm quickly during chilling. This makes them a practical option for parties, holiday trays, homemade gifts, or simply keeping a small treat available in the refrigerator.
Easy Keto Chocolate Nougat Candy
Description:
A simple no-bake keto chocolate candy made with creamy coconut filling, sugar-free sweetener, vanilla, and a smooth dark chocolate coating. These homemade low-carb candy bars are rich, chewy, and ideal for preparing ahead.
Preparation & Cooking Duration:
Preparation Time: 10 minutes
Cooking/Melting Time: 40 minutes
Chilling Time: About 30 minutes
Total Active Time: About 50 minutes
Serving:
20 servings
Ingredients:
For the Coconut Filling
- 100 grams coconut oil
- 75 grams coconut cream, scooped from a cold can of coconut cream refrigerated overnight
- 200 grams sugar-free desiccated coconut
- 1 teaspoon vanilla extract
- 1–2 tablespoons stevia blend, or your favorite sugar-free sweetener, to taste
For the Chocolate Coating
- 200 grams dark chocolate, 85% dark chocolate works well
Step-by-Step Instructions:
- Melt the Coconut Oil: Gently heat the coconut oil in the microwave or on the stovetop until completely liquid. Allow it to cool slightly before continuing.
- Combine the Wet Ingredients: Add the melted coconut oil, coconut cream, and vanilla extract to a mixing bowl. Whisk until the mixture is smooth and well combined.
- Make the Coconut Filling: Add the sugar-free desiccated coconut and stevia blend. Stir thoroughly until the coconut is evenly coated and the mixture becomes thick enough to shape.
- Shape the Bars: Divide the mixture into approximately 20 portions. Press each portion firmly into a small bar shape. If the mixture feels too soft, chill it briefly before shaping.
- Chill Until Firm: Arrange the shaped bars on a tray lined with baking paper. Freeze for approximately 30 minutes, or until the bars feel firm enough to handle.
- Melt the Chocolate: Gently melt the dark chocolate in short microwave intervals or over low heat on the stovetop. Stir regularly until completely smooth.
- Coat the Candy: Using a fork or dipping tool, place each chilled coconut bar into the melted chocolate. Turn carefully until all sides are coated. Lift the bar out and allow excess chocolate to drip away.
- Set the Chocolate: Place the coated bars on baking paper. Allow them to sit until the chocolate has hardened completely. Refrigerating them can speed up the setting process.
- Serve: Once the coating has set, the keto chocolate nougat candies are ready to serve. Keep any remaining pieces refrigerated in an airtight container.
Nutritional Information:
Approximate per 20 g serving:
- Calories: 184 kcal
- Fat: 17 g
- Carbohydrates: 3 g
- Fiber: 3 g
- Protein: 2 g