 admin1
Banana Pudding is a classic homemade dessert that brings together layers of creamy vanilla pudding, fresh banana slices, and crunchy vanilla wafers. Every spoonful is filled with smooth, sweet, and comforting flavors that make this dessert perfect for family gatherings, holidays, parties, or a simple weekend treat. The best part is that you don’t need an oven to make it. With a few simple ingredients and some chilling time, you can prepare a delicious dessert that looks beautiful and tastes even better.
This easy Banana Pudding Recipe is perfect for anyone who loves creamy desserts with fresh fruit. The combination of ripe bananas, rich vanilla pudding, and soft cookies creates a wonderful texture. As the dessert rests in the refrigerator, the vanilla wafers absorb some of the pudding and become soft, cake-like layers. Meanwhile, the bananas add natural sweetness and a fresh flavor that balances the creamy filling.
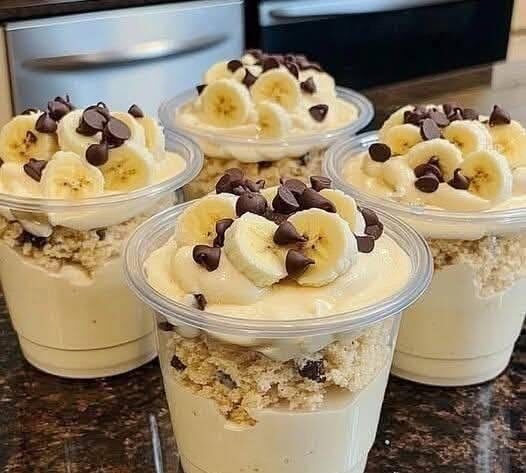
Whether you are preparing dessert for your family or bringing something special to a gathering, this homemade banana pudding is always a great choice. It can be prepared ahead of time, assembled in a large serving dish, and decorated with extra banana slices and crushed vanilla wafers. You can also make it in individual dessert cups for a beautiful presentation.
What Is Banana Pudding?
Banana pudding is a traditional layered dessert made with bananas, vanilla pudding, cookies, and sometimes whipped cream. It is especially popular in Southern American cooking, where homemade banana pudding has been enjoyed for generations. Traditional versions often use homemade custard, while modern recipes frequently use instant vanilla pudding to make preparation quicker and easier.
The dessert is known for its simple ingredients and delicious combination of textures. Fresh banana slices provide a soft and fruity layer, vanilla pudding creates a smooth and creamy filling, and vanilla wafers add sweetness and structure. After chilling, the cookies soften and blend beautifully with the pudding.
One reason banana pudding is so popular is that it can be customized in many different ways. Some people prefer a rich homemade custard, while others enjoy a lighter version made with whipped cream. You can also add cream cheese for extra richness or use different cookies to create a slightly different flavor.
Why You Will Love This Banana Pudding Recipe
There are many reasons to add this easy banana pudding recipe to your dessert collection. First, it requires simple ingredients that are easy to find at most grocery stores. You don’t need complicated baking equipment, special cooking skills, or hours of preparation.
Another reason to love this dessert is its creamy consistency. The vanilla pudding and whipped topping create a smooth filling that pairs wonderfully with fresh bananas. The vanilla wafers gradually soften in the refrigerator, making every layer taste rich and delicious.
This recipe is also perfect for preparing ahead of time. You can assemble the pudding several hours before serving and allow it to chill until the flavors come together. This makes it especially convenient when preparing food for guests or special occasions.
The recipe is easy to adjust depending on your preferences. You can make it sweeter, add extra bananas, include a cream cheese layer, or finish it with crushed cookies. It is a flexible dessert that can be adapted to suit different tastes.
Ingredients for Homemade Banana Pudding
You only need a handful of everyday ingredients to prepare this delicious dessert. Each ingredient plays an important role in creating the creamy filling and soft layered texture.
1. Ripe Bananas
Fresh ripe bananas are the main ingredient in this recipe. They provide natural sweetness, fruity flavor, and a soft texture that works beautifully with vanilla pudding. Choose bananas that are yellow and ripe but still firm enough to slice neatly. Avoid bananas with too many dark spots or an overly soft texture because they may become mushy between the layers.
2. Vanilla Pudding Mix
Vanilla pudding mix creates the creamy base of the dessert. It provides a classic vanilla flavor and helps make the recipe quick and convenient. Instant vanilla pudding is especially useful because it thickens without requiring stovetop cooking. Follow the package instructions for the correct amount of milk.
3. Cold Milk
Milk helps the pudding mix develop its smooth consistency. Whole milk is a good option because it creates a richer filling, but 2% milk can also work. Make sure the milk is cold when preparing instant pudding to help it thicken properly.
4. Vanilla Wafers
Vanilla wafers provide the classic cookie layers that make banana pudding so recognizable. Their sweet vanilla flavor complements the bananas and pudding perfectly. As the dessert chills, the cookies soften and develop a tender, cake-like texture.
5. Whipped Topping
Whipped topping adds lightness and a fluffy texture to the pudding mixture. It balances the richness of the vanilla pudding and makes the dessert feel soft and airy. Make sure the whipped topping is thawed according to the package instructions before folding it into the mixture.
6. Sweetened Condensed Milk
Sweetened condensed milk adds sweetness and richness to the pudding. It gives the filling a smooth texture and helps create a dessert that tastes wonderfully creamy. A little goes a long way, so use the amount listed in the recipe.
7. Vanilla Extract
Vanilla extract enhances the flavor of the pudding and gives the dessert a warm, bakery-style aroma. Pure vanilla extract is a lovely choice, although regular vanilla extract works well too.
8. Lemon Juice (Optional)
A small amount of lemon juice can help slow down browning on the banana slices. It also adds a slight freshness that balances the sweetness. Use only a little so it does not overpower the vanilla flavor.
Kitchen Equipment You Need
This recipe does not require special kitchen equipment. A few basic tools are enough to prepare and assemble everything.
- Large mixing bowl
- Electric hand mixer or whisk
- Measuring cups
- Measuring spoons
- Rubber spatula
- Sharp knife
- Cutting board
- Serving dish or trifle bowl
- Plastic wrap or airtight cover
A glass serving dish is especially useful because it allows you to see the beautiful layers of bananas, cookies, and pudding.
How to Make Banana Pudding
Making homemade banana pudding is simple when you prepare each layer separately before assembling the dessert. Follow these easy steps for a smooth filling and attractive layers.
Step 1: Prepare the Pudding Mixture
Start by pouring the cold milk into a large mixing bowl. Add the instant vanilla pudding mix and whisk until the mixture becomes smooth. Continue whisking for approximately two minutes or follow the instructions on the pudding package.
Allow the pudding to rest for a few minutes until it begins to thicken. It should have a smooth and creamy consistency without any visible lumps. If the mixture looks too thin, give it a little more time to set.
Step 2: Add the Sweetened Condensed Milk
Once the pudding has thickened, add the sweetened condensed milk and vanilla extract. Mix everything together until fully combined.
The condensed milk gives the filling a richer flavor and adds a pleasant sweetness. Scrape the sides of the bowl with a rubber spatula to make sure all the ingredients are incorporated evenly.
Step 3: Fold in the Whipped Topping
Add the thawed whipped topping to the pudding mixture. Use a rubber spatula to gently fold it in.
Avoid mixing too aggressively because you want to keep the filling light and fluffy. Continue folding until the mixture has an even color and smooth consistency.
Place the finished pudding mixture in the refrigerator while you prepare the bananas and cookies.
Step 4: Slice the Bananas
Peel the bananas and place them on a clean cutting board. Slice them into even rounds, approximately ¼ inch thick.
Try to keep the banana slices similar in size so they form neat layers in the serving dish. If desired, lightly toss the slices with a small amount of lemon juice to help slow down browning.
Prepare the bananas shortly before assembling the dessert for the freshest flavor and appearance.
Step 5: Arrange the First Cookie Layer
Choose a medium or large serving dish. Arrange a single layer of vanilla wafers across the bottom.
Place the cookies close together so they cover most of the surface. You can break a few cookies into smaller pieces to fill any gaps.
This first layer provides a sweet foundation for the pudding and helps create the classic banana pudding texture.
Step 6: Add the Banana Slices
Arrange a layer of banana slices over the vanilla wafers. Spread them evenly so each serving contains a good amount of fresh banana.
Avoid placing too many banana slices in one area. An even layer makes the dessert easier to serve and gives every spoonful a balanced combination of ingredients.
Step 7: Spread the Pudding Mixture
Remove the prepared pudding mixture from the refrigerator. Spoon a generous amount over the bananas and spread it gently with a spatula.
Make sure the pudding covers the banana slices and reaches the edges of the dish. This helps hold the layers together and creates the smooth, creamy texture that makes banana pudding so delicious.
Step 8: Repeat the Layers
Continue adding layers of vanilla wafers, banana slices, and pudding mixture until you have used the ingredients.
Depending on the size of your serving dish, you may create two or three complete layers. Finish with a smooth layer of pudding on top.
For a more decorative presentation, reserve a few vanilla wafers and some crushed cookies for the final topping.
Step 9: Add the Topping
Sprinkle crushed vanilla wafers over the top of the pudding. You can also arrange a few whole cookies around the edges of the serving dish.
If you are serving the dessert immediately, you may add a few fresh banana slices as decoration. However, if you plan to refrigerate it for several hours, add fresh banana slices closer to serving time to keep them looking attractive.
Step 10: Chill Before Serving
Cover the serving dish with plastic wrap or an airtight lid. Place it in the refrigerator for at least four hours.
Chilling allows the cookies to soften and the layers to settle together. The pudding also becomes firmer, making it easier to scoop and serve.
For the best texture, prepare the dessert several hours ahead of time. Serve chilled and enjoy!
Tips for Making the Best Banana Pudding
A few simple tips can help you achieve the perfect homemade banana pudding every time.
Choose the Right Bananas: Use ripe but firm bananas. They should be naturally sweet without being overly soft. Very ripe bananas can become mushy after several hours in the pudding.
Use Cold Milk: Cold milk helps instant pudding thicken properly. Follow the package directions for the correct milk quantity.
Fold the Whipped Topping Gently: Gentle folding keeps the filling light and fluffy. Avoid overmixing once the whipped topping has been added.
Allow Enough Chilling Time: Refrigeration is important because it allows the vanilla wafers to absorb moisture from the pudding. This creates the soft cookie layers that make the dessert special.
Do Not Add Too Many Bananas: Although bananas are the star ingredient, too many slices can make the dessert watery or difficult to serve. Use even layers for the best balance.
Decorate Before Serving: Fresh banana slices can brown over time. For the prettiest presentation, add the final banana garnish shortly before serving.
Best Bananas to Use for This Recipe
The type and ripeness of bananas can make a noticeable difference in the final dessert. Ideally, choose bananas that are fully yellow with a firm texture.
Bananas that are slightly underripe may not provide enough sweetness, while extremely ripe bananas can become too soft when layered with pudding.
Medium-sized bananas are convenient because they are easy to slice and distribute evenly. If your bananas are particularly large, you may need fewer of them.
Fresh bananas also provide a pleasant contrast to the sweet pudding and cookies. Their natural fruity flavor helps keep the dessert from tasting overly rich.
Can You Make Banana Pudding Ahead of Time?
Yes! Banana pudding is an excellent make-ahead dessert. In fact, preparing it several hours before serving often improves its texture.
When the assembled dessert rests in the refrigerator, the vanilla wafers gradually absorb moisture from the pudding. They become softer and develop a texture similar to a light cake.
You can prepare the entire dessert earlier in the day and keep it refrigerated until serving time. For the best appearance, add the decorative banana slices and cookie topping shortly before serving.
If preparing the dessert a day ahead, remember that the bananas may darken and become softer. For special occasions, preparing it on the same day is a good way to maintain its fresh appearance.
How to Store Leftover Banana Pudding
Store leftover banana pudding in an airtight container or cover the serving dish tightly with plastic wrap. Keep it refrigerated at all times when it is not being served.
For the best quality, enjoy it within two days. The bananas may gradually soften and darken, while the cookies continue absorbing moisture from the pudding.
Always use a clean serving spoon when scooping the dessert. Avoid leaving banana pudding at room temperature for extended periods because it contains dairy and fresh fruit.
Can You Freeze Banana Pudding?
Freezing banana pudding is generally not recommended if you want to maintain its original creamy texture.
The pudding mixture may separate after thawing, and the bananas can become mushy. The vanilla wafers may also lose their pleasant soft texture.
For the best results, prepare only the amount you expect to serve within a couple of days. Refrigeration is the better storage option for this dessert.
Delicious Ways to Customize Banana Pudding
One of the best things about homemade banana pudding is how easily you can change the flavor. The traditional combination is delicious on its own, but a few additional ingredients can make it even more interesting.
Chocolate Banana Pudding: Add a layer of chocolate pudding or sprinkle chocolate shavings between the layers. Chocolate and banana make a wonderful flavor combination.
Cream Cheese Banana Pudding: Beat softened cream cheese until smooth before combining it with the pudding mixture. This creates a richer filling with a slightly tangy flavor.
Caramel Banana Pudding: Drizzle a little caramel sauce between the layers or over the finished dessert. The caramel adds a buttery sweetness that complements the bananas.
Strawberry Banana Pudding: Add thinly sliced fresh strawberries between the layers for a fruity variation. Strawberries bring a refreshing flavor and beautiful color.
Peanut Butter Banana Pudding: Add a small amount of creamy peanut butter to the pudding mixture for a nutty flavor. It pairs especially well with vanilla wafers and bananas.
Individual Banana Pudding Cups: Instead of using one large dish, assemble the ingredients in small glasses or dessert cups. This creates convenient individual servings that are perfect for parties.
What to Serve with Banana Pudding
Banana pudding is a satisfying dessert on its own, but it can also be served alongside other sweet treats.
It pairs beautifully with freshly brewed coffee, tea, or a glass of cold milk. The creamy vanilla flavor also works well after a family meal, especially when served alongside lighter desserts such as fresh fruit or simple cookies.
For parties and celebrations, serve banana pudding in a large glass trifle bowl with extra vanilla wafers on top. Individual dessert cups are another attractive option because guests can easily take their own portions.
Common Mistakes to Avoid
Even though banana pudding is an easy dessert, a few small mistakes can affect its final texture.
One common mistake is using bananas that are too ripe. Very soft bananas can become mushy and lose their shape after being layered with the pudding.
Another mistake is not allowing enough chilling time. Serving the pudding immediately after assembly means the cookies will remain crunchy and the layers may not hold together as nicely.
Using too much milk can also make the filling too thin. Always follow the pudding package instructions and measure carefully.
Finally, avoid adding fresh banana slices too early as decoration. Exposure to air can cause them to darken, making the dessert look less appealing.
Frequently Asked Questions
1. How long does banana pudding need to chill?
Banana pudding should chill for at least four hours before serving. This gives the pudding time to set and allows the vanilla wafers to soften.
2. Can I use homemade vanilla pudding?
Yes! Homemade vanilla pudding works beautifully in this recipe. Allow it to cool completely before combining it with the other ingredients.
3. Why is my banana pudding runny?
Banana pudding can become runny if too much milk is used, the pudding has not thickened properly, or the dessert has not chilled long enough. Measure the ingredients carefully and allow sufficient refrigeration time.
4. Can I use graham crackers instead of vanilla wafers?
Yes. Graham crackers are a good alternative and provide a slightly different flavor. They also soften nicely after chilling.
5. Can I make banana pudding without whipped topping?
Yes. You can use homemade whipped cream instead. Whip cold heavy cream until soft or medium peaks form, then gently fold it into the pudding mixture.
6. How do I keep bananas from turning brown?
Slice the bananas shortly before assembling the dessert. A small amount of lemon juice can help slow browning, and keeping the pudding covered in the refrigerator also helps.
7. Can I make individual servings?
Absolutely! Layer the cookies, bananas, and pudding in small dessert glasses or jars. This is a convenient way to serve banana pudding at parties.
8. Is banana pudding served warm or cold?
Banana pudding is traditionally served chilled. Refrigeration helps the pudding set and allows the cookies to soften.
9. Can I use different flavors of pudding?
Yes. Cheesecake, banana cream, or chocolate pudding can create delicious variations. Vanilla remains the classic choice.
10. How long can banana pudding stay in the refrigerator?
For the best flavor and texture, enjoy banana pudding within two days. Keep it covered and refrigerated between servings.
Final Thoughts
This homemade Banana Pudding Recipe is an easy and delicious dessert that combines fresh bananas, creamy vanilla pudding, and sweet vanilla wafers in every bite. It requires no baking, uses simple ingredients, and can be prepared ahead of time, making it a wonderful option for busy days and special occasions.
Whether you serve it in a large glass dish or individual dessert cups, this classic treat is sure to be a welcome addition to your dessert table. The creamy filling, soft cookies, and naturally sweet bananas create a combination that is hard to resist.
Make this easy banana pudding for your next family gathering, holiday celebration, or weekend dessert. Once you try it, you may find yourself making it again and again!
Banana Pudding Recipe Card
Recipe Name: Banana Pudding
Description: A creamy no-bake dessert made with layers of fresh bananas, smooth vanilla pudding, fluffy whipped topping, and sweet vanilla wafers. Perfect for parties, family gatherings, and make-ahead desserts.
Preparation Time: 20 minutes
Cooking Time: 0 minutes
Chilling Time: 4 hours
Total Time: 4 hours 20 minutes
Servings: 8
Ingredients
- 4 ripe but firm bananas
- 1 package (3.4 oz) instant vanilla pudding mix
- 2 cups cold milk (or the amount specified on the pudding package)
- 1 can (14 oz) sweetened condensed milk
- 1 container (8 oz) whipped topping, thawed
- 1 teaspoon vanilla extract
- 1 box (11 oz) vanilla wafers
- 1 teaspoon lemon juice (optional)
Instructions
- Pour cold milk into a large mixing bowl and add the instant vanilla pudding mix.
- Whisk for approximately two minutes until smooth and allow it to thicken.
- Add sweetened condensed milk and vanilla extract. Mix until combined.
- Gently fold in the thawed whipped topping until the mixture becomes light and creamy.
- Peel and slice the bananas into even rounds.
- Arrange a layer of vanilla wafers in the bottom of a serving dish.
- Add a layer of banana slices over the cookies.
- Spread a generous layer of pudding mixture over the bananas.
- Repeat the layers until all ingredients are used, finishing with pudding.
- Sprinkle crushed vanilla wafers over the top.
- Cover and refrigerate for at least four hours.
- Add fresh banana slices for decoration just before serving, if desired.
- Serve chilled and enjoy!
Nutritional Information
Estimated values per serving; actual nutrition depends on the brands and ingredients used.
| Nutrient | Amount |
|---|---|
| Calories | 420 kcal |
| Protein | 6 g |
| Carbohydrates | 68 g |
| Fat | 14 g |
| Saturated Fat | 8 g |
| Fiber | 2 g |
| Sugar | 48 g |
| Sodium | 270 mg |
Recipe Notes:
Store leftovers covered in the refrigerator and enjoy within two days.
Use firm, ripe bananas for the best texture.
Keep the pudding refrigerated until serving.
Allow at least four hours of chilling time.
Add decorative banana slices shortly before serving.